Monday, November 27, 2006
Washing Up: Laundry Survival Strategies
Laundry has been heavy on my mind this week as our 4 year old washing machine recently began eating our clothing.
Apparently my mind is not the only one trolling the laundry room as Parent Hacks is currently discussing laundry strategies.
Somehow, in the past decade, I have come to actually enjoy doing the laundry. One of my friends really loves to vacuum and mow the yard because he sees progress with his actions. With laundry I can see, touch, and smell success. Sure, everything is soon in the hamper again, but laundry offers a special supervisory bliss in which machines do most of the work. It's work lite- fewer calories burnt but all the bragging rights of the original.
After years of hauling our laundry to laundromats and relatives' homes, we decided to opt for capacity in our conveyances. In those vagabond years we used two huge army duffel bags (which had plenty of space for detergent and dryer sheets) and presorted at home for convenience. Plus, when you're washing on the generosity of others or stuck in a laundromat, it's a bit awkward & time consuming to be checking all the pockets and turning clothes right side out. We got in the habit of having everything washer-ready when it hit the duffel. This transport and storage system was happily abandoned when we finally got an apartment with washer and dryer hookups, but the habit of having everything ready to wash is one of our best practices.
We then moved into traditional rectangular baskets. These were the kiss of death. Laundry, clean and dirty, languished in them. Sometimes we also threw in mail, books, or whatever else we needed to move out of sight and the rectangles grew to towers of disused stuff in quiet corners of our apartment.
This pattern continued into our first home where the laundry room could accumulate a startling number of abandoned baskets. After losing most of the room and scrounging the absolute dregs of our wardrobe out the closet, I finally decided to take action.
In pre-married life, I'd had a 3 section sorter. It was an abysmal failure. Somehow the third basket muddied my thinking and caused laundry paralysis. The baskets weren't very large, and I don't like to do laundry all that often (even now). No more sorters for us. Hampers were also out of the question because you have to transfer everything to a basket and then carry all the stuff to the laundry room and sort. What a pain. Plus, hamper funk is a reality one must confront to retrieve all the socks from the very bottom.
We needed a large solution that allowed pre-sorting. Our solution is two Rubbermaid Flex N' Carry hampers (blue for darks and white for lights; how literal). These are for our cold water wash items. They hold a lot of laundry but still fit under hanging shirts in our closet. They allow the laundry to breathe, so hamper funk isn't a problem. Transfer is unnecessary as they are carried directly to the laundry room. Each basket holds 2 loads, so I take one to the laundry room at a time. Load 1 transfers to the dryer as load 2 gets suds. An ambitious person might fold load 1 when they put load 2 in the dryer. Usually both loads of clean laundry get tossed in the hamper and are dumped on our bed before they wrinkle badly. Leaving them on our bed forces us to fold before sleep. It's slightly ridiculous, but it works. The folded laundry begs to be put away in the closet a few feet away. The hamper is reinstated before much new laundry can accumulate.
We keep two white rectangular baskets nested in the closet for items washed in hot water (burp rags, undershirts, and the like). When the top basket is full, it is taken downstairs leaving the second to catch all new hot water wash items.
Similarly, BabyGeek's laundry is also double nested rectangle system (though the baskets are a different style which intentionally won't nest with the hot water wash baskets). If BabyGeek's laundry isn't immediately put away and lingers in a basket, I still have one in the closet for dirty clothes. Things feel really unresolved if I remove the second basket before replacing the first, so I rarely ever leave clean, folded clothes languishing in quiet places. I suspect when he gets into larger clothing he'll get a Flex N' Carry type hamper of his own and he'll learn to sort into two loads in the laundry room.
Wednesday, November 22, 2006
Casting Lots: A Homemade Baby and Child Safe Dice Container
With Thanksgiving and National Games Week upon us, board games are emerging from closets all over America.
Most games with choking hazard sized dice are aimed at children old enough to keep them out of their tracheas. However those older, wiser children may have younger, less sensible infant/toddler siblings, cousins, friends, or guests who consider the tiny blocks the height of culinary fashion.
Dice may fall into tiny, unauthorized hands when older kids get distracted from their game, finish without picking up, or simply face a relentless toddler onslaught.
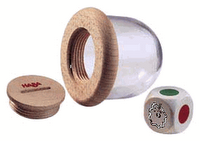
Some months ago, we saw a clever (but expensive) solution for this at our local toy store. Haba makes a fill-it yourself Dice Tumbler. It's versatile in a way that their one die and two dice shakers are not. It allows for specialized dice and possibly more than two if they're small. All Haba's models have a nice clear dome cost at least $10 when you buy locally or factor in shipping online. We put the tumbler on our family gift wish list and promptly forgot about it (sometimes I am hard to part from $10).
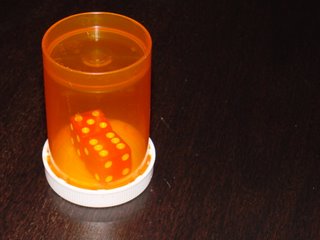
A few days ago I needed to take a couple dice to my ESL class. As I didn't want to lose them in my bag I grabbed a clean, fat pill bottle (~1.5 inch diameter) to contain them.
We reuse pill bottles a lot (and even ask friends and relatives to save them for us). They are great locking containers for needles, thumbtacks, hairpins, rings, earrings, coins, and a whole host of other small objects. Maybe it was the routine of using a pill bottle to store stuff, but I completely missed the obvious dice dome in my hand.
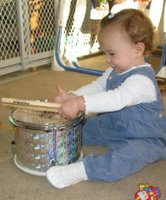
At class, BabyGeek procured the container from my bag and EUREKA(!) a hack was born. He views the container as a very fine baby-sized maraca, but I plan to leave a few fat bottles in the game closet.
The bottle can be either shaken and placed cap down (as pictured) or, for the enthusiastic gamer, the whole object can be thrown. No matter what side the container lands on, there are dice definitively facing up.
Our improvised dice dome is actually so irresistible to BabyGeek that while I was snapping a picture of the hack, a small hand invaded the frame and extracted the subject. He didn't put it down for half an hour despite being surrounded by other toys.
Maybe he is trying to break into the competitive and lucrative world of baby hand models.
Happy Thanksgiving, and happy gaming!
Tuesday, November 14, 2006
These Booties Are Made For Wearing: An Alternative to Supergluing Shoes and Socks
Baby Geek, like most other geeks, can't help but tinker. His status as a baby however, affords him only a limited amount of objects for tinkering. Socks are really ideal because they usually are in close proximity (at least initially) and they have the magical power of being reinstated after being discarded. What perfect objects for manipulation.
With his ongoing fascination with socks and their removal, one would assume that shoes would be even more well-received as they are simply a more advanced version of the same puzzle. Sadly, this was not the case. The first (and last) time we put conventional shoes on Baby Geek, he screamed like animal caught in a trap- a very painful trap with large and pointy teeth. He clawed at his feet and screamed with such a level of duress that our neighbors started piling into their tornado shelters at the sound of his inhuman wail. [No, we were not wearing any hearing protection at the time.] The shoes were a little big and were completely free of the deadly spiders common in our region.
He laid on his belly and wept/screamed even after the offending footwear was removed. This was not a tantrum- it was wholesale terror on his part. As a rare concession, we swore off all footwear for the entire summer (with the rare exception of socks that he would readily dispatch to the Great Lost and Found Box in the Sky).
As the fall weather began to turn cool, I realized that I would have to either wardrobe him entirely in footie jammies, force him to wear socks and shoes, face prosecution for barefoot child neglect, or find some shoes that wouldn't turn him into a wounded creature.
Researching new footwear seemed necessary. I called my dear friend with two older children- each of whom possess a strong will and two feet.
me: "Did your kids like shoes when they were little?"
friend: [good humored laughter]
me: "What did you do?"
friend: "Suffered through with our oldest. For our youngest, my sister-in-law sent me striped slipper socks from Hanna Andersson. He wore them all Fall, Winter, and Spring. They were totally worn out by the time he outgrew them."
Immediately after ending the call, I was googling: Hanna Andersson, "slipper socks," "moccasin socks," "baby moccasins," and so on. It appears the Swedes have know about the magical staying power of slipper socks for generations (but maybe it's no wonder with their cool climate).
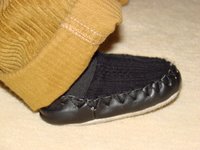
While I liked Hanna Andersson's slippers, I was intruiged by Nowa Li's Cable Knit Moccasin's elastic strap at the ankle ($18.95 + s/h). This baby-removal prevention device seemed promising, maybe too promising to be true.
When the parcel arrived from New Jersey, my older punk-rock brother and his fine friend Brother Hezekiah of punk-bluegrass fusion band Colonel Sander's Grave were over.
"They look like ballet slippers," Uncle Punk smirked.
"My mom used to make me wear Buster Browns in elementary school. Those were worse. Even the nuns made fun of me." [Brother Hezekiah]
Undaunted, I put them on Baby Geek who responded with atypical indifference. He paid them no mind and they ranked as "inoffensive" which is the best one can hope for with toddlers and teenagers.
Baby Geek has worn them almost daily since their arrival. We absolutely adore them and on the days he hasn't worn them he was wearing his Firetruck moccasins (no elastic ankle band, but a stylish pattern and a great clearance price of $9). Nowa Li's flame moccasin might have been the best choice in the eyes of Uncle Punk and Bro. Hezekiah, but alas, they were already sold out.
There really is a substantial mechanical advantage to the elastic banded moccassin. They are more difficult for the baby to remove, although not impossible. The elastic band makes toe-pulling alone completely ineffectual. To remove the moccasin, one must first pull down on the heel before pulling on the toe. This confounds tiny babes and seems like too much trouble for older ones.
The regular slipper sock style moccasins are more easily removed through toe-tugging, but overall, Baby Geek is content to leave them on his feet. Only when he's bored in the car seat or stroller does he remove the regular mocs. He has only removed the cable knit ones twice (most likely to prove it could be done and then prove that the results were replicable).
Baby Geek's moccasins have attracted much attention among our friends with infants. More and more of his cohort (like the gorgeous twin pictured in the white and slippers) are now wearing Nowa Li moccasins.
They will be a generation with "ballet slipper" photographs. At least their generation will be able to photoshop in little combat boots when they're older.
Update: 12/4/06
It turns out that Nowa Li manufactures the Hannah Andersson brand slipper socks and moccasins.
In case any adult is jealous of such cozy footwear, Nowa Li offers cable knit moccasins in grown-up sizes (navy or oatmeal).
The sizes run a little large, so we order one size smaller in children's slippers than the size chart suggests. The adult size chart is for men- not women- and it also runs large.
Friday, November 10, 2006
Mind the Gaps: Babyproofing a railing & banister without breaking the bank
Our living room is bordered on one end by a banister and staircase opening to the lower level. This didn't seem like any big deal to the childless people we were when we bought this house, but our newer, more savvy selves were horrified when our baby began crawling and headed right for the banister (on his way to the family's collections of pointy and/or fragile things).
We priced Babies R Us's railing netting. It was expensive for the quality and had enough negative ratings to give us pause. It came in one color: white. It was fastened by strings- which baby Geek would either tug endlessly and/or eat. It seemed to be less-than-flexible in accommodating our staircase railing's odd angle.
As the DIYer parents we are, we sought alternatives. That took us to Anchor Industries' factory outlet: http://www.anchorinc.com/outletstore.html My dad is an engineer for Anchor, so he gets a sweet discount. They don't list their surplus awning skirts online, but they do indeed have them in the outlet.
Materials
As Anchor is the maker of custom tents and awnings, I knew I could find a world of grommets and fabrics with which to enclose our banister. I had no idea that answer was pre-made, masquerading as an "awning skirt."
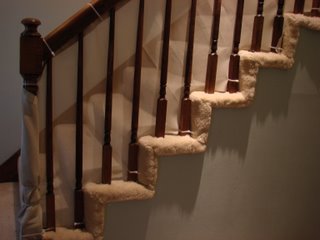
This delightfully pre-grommeted and presewn weather-resistant fabric (great for outdoor porches and patios) is sturdy as well as cheap (about $2.50/YARD while the best prices on banister enclosures average around $2/FOOT). The fabric has grommets every foot along one straight side. The opposite side has a scalloped cut and small piping accent. It's quirky-stylish, or so we tell ourselves...
When measuring, it is critical to allow for surplus footage for each end of your barrier if you intend to either fasten the end to a wall or wrap the end around a rail or newel post. Another advantage of this material is that you can purchase it in LONG continuous lengths (most of the babyproofing supplies are in 5' or 15' foot lengths, so then you must figure out how to "stitch" the ends together in some type of effective overlap.
The material cuts well with household scissors, so we were able to closely shape it to our staircase. It is much less opaque than cloth or canvas, so you can see through it (though the photos may not convey this well). We didn't want to use a clear barrier less baby Geek think all open railings have invisible protective barriers.
Installation
IMPORTANT NOTE: when fastening the material to the banister remember to allow surplus on the ends if you intend to secure the material to a wall or wrap it around a rail/post.
Using 14" plastic zip ties (the best thing since duct tape), we fastened the top grommeted edge of the awning skirt along the railing's fat handrail. We chose to use the grommets at the top because the top fasteners will bear most of the strain when things press against the fabric. The grommets seemed least likely to stretch or tear over time. We left the upper zip ties a little loose until we installed all the zip ties and then pulled everything taut.
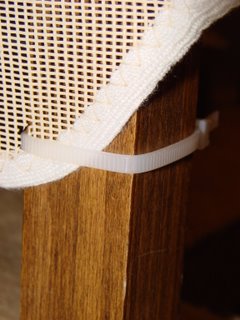
The opposite edge of the panel has a gentle scallop design which hung at the bottom. We cut tiny slits into the fabric at each rail and pulled zip ties through- locking them around the posts after pulling everything taut. Again, we used 14" zip ties, but hindsight reveals that a cheaper, much shorter length would have worked equally well.
Anchoring to Wall
At the end of the railing, we have the largest gap between rails. A standing toddler could quite easily slip through the 8 inch gap between the wall and the first rail (and anyone with a toddler knows they head straight for danger and/or destruction). Rather than overfeeding our toddler into captivity (skinny kids could always visit anyway), we anchored the end to the wall. We were going to install wall anchors, but found a stud directly below the point where the banister connected to the wall.
Jim drilled some pilot holes in a flat, skinny piece of hardwood, we rolled the wood in the surplus cloth. Jim used two washers- a very large plastic one and a smaller one in metal. The plastic washer helped prevent/hide the distortion of the skirt when subjected to the twisting of the power drill. Unfortunately, the plastic washer's opening was much larger than the head of our screws, so we added a tasty metal washer to keep the plastic one in place. I like the end effect, but I've always liked an exposed infastructure look, so who am I to judge style?
Securing to Newel Post
After crossing the living room and winding down the stairs, the other end of the barrier fabric terminates at the newel post. One this end I opted to wrap the post tightly and zip tie to connect. It's one thing to put holes in walls around here, but we try to minimize the drilling into woodwork for reasons both structural and aesthetic.
Time
The whole project would have taken about 1 hour and a half continuously if we hadn't procrastinated for weeks about drilling the pilot holes in the skinny board. But what fun is a project that doesn't drag on and on?
Tools
Household scissors, power drill, and preferably two people (helpful in simultaneously securing and pulling taut; plus it's hard to argue methods alone)
Materials
* Skinny piece of wood (1" x 2"; length was equal to the distance between the banister handrail and our wooden floor trim)
* Zip ties (our fat handrail needed a surprising 14" tie, our skinny posts could easily have taken a shorter/cheaper length). Sold locally in bags of white, black, assorted NEON, and other colors.
* Little stuff/choking hazards: screws, plastic & metal washers
* Awning skirt- preferably in one continuous length. I know, you're thinking, where will I buy awning skirt? Because you are so nice, I will gladly share my source with you (though you can have neither my father nor his discount): 1 (800) 575- 2698 (M to F: 8 -4:30, CST).
Anchor Industries is a family-owned business with an exceptionally friendly staff. I'm sure a kind caller with a credit card could attain a nice length of awning skirt by mail. They have a variety of colors (including a very luxury cruiseliner baby blue with navy and white running stripes) though the availability changes frequently.
The end effect of the barrier is slightly nautical (somewhat like our solution for babyproofing bi-fold doors).
The only question we have now is what name to paint on the life ring we're going to hang on the finished railing: Pequod? Edmund Fitzgerald? Love Boat? Ship of Fools? So many choices.